Wednesday 26 May 2010

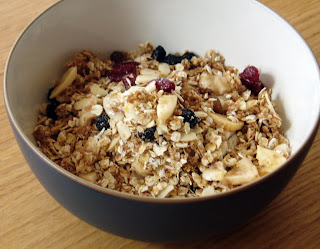
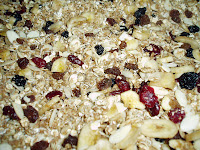
Granola

I have never been a big fan of breakfast, not the relaxed weekend breakfast that is one of my guilty pleasures, but the rushed weekday breakfast. The one that you know is good for you but that you just can't stomach before you have to dash out of the house and often skip in favour of vast quantities of coffee. In recent years I have made a concerted effort with weekday breakfast but often find pre-packaged cereals a chore and often get bored with them before the end of the box. I was introduced to the joys of granola and yogurt as an alternative breakfast through a friend and a pre-packaged supermarket pot, and while I found this a pleasant way to start the day I found that shop bought boxes of granola are often oily, expensive and scrimp on the fruit. 

I decided that making my own granola would be the perfect solution to getting granola just the way I like it. I used a recipe for Not-Too-Crunchy Granola from The Desperate Housewives Cookbook (a gift from Mr M after a business trip to the Sates) as a base but have adapted it to make it less oily and just the way I like it and to reflect the dried fruits and nuts in the cupboard. I especially like serving granola with natural yogurt and berry compote.

Granola
(Adapted from The Desperate Housewives Cookbook)

FryLight sunflower spray (I found this the best way to make the granola less greasy)
3-cups porridge oats
1/2 cup oat bran (or wheat germ)
1 cup flaked almonds (or any nut you prefer)
3/4 cup dessicated coconut
1/3 cup maple syrup (or honey)
1/3 cup light brown sugar
1/3 cup sultanas
1/3 cup dried cranberries
1/3 cup dried blueberries (or your favourite dried fruit)
1 cup banana chips, broken into pieces (make sure you get crunchy banana chips, the softer ones tend to go slimy when you add milk or yogurt)


  •  Preheat the oven to 1500C (fan assisted).
  • Spray a large, deep pan with the sunflower spray, add the oats, bran, nuts and coconut. Mix well and spray a few more times with the sunflower spray. Make sure the mixture is spread evenly onto the tray and bake stirring occasionally. 
  • Whisk the syrup and sugar with 2 tbsp of water in a jug. When the oat mixture is lightly browned (around 40 min) drizzle over the syrup mixture and stir well. Bake, stirring occasionally until the mixture is dry and crunchy but still light brown (15 - 30 minutes), you need to keep a close eye on the mixture to avoid burning. 
  • Remove from the oven and stir in the banana chips and fruit. 
  • Store in an airtight container.

Saturday 22 May 2010

Lower Fat Lemon Yoghurt Cake

The first time my now mother-in-law cooked for me she made the most wonderful butternut squash and cream cheese soup using a great recipe from The New Dairy Cookbook by Sue Ashworth. This is a great book that is a modern version of the Milk Marketing Board's dairy cookbooks that graced my own mothers shelves. After borrowing the book for an extended loan I decided that I should invest in a copy of my own. By definition the book does not always lend itself to low fat and healthy cooking but the availability of low fat dairy products and a little tweaking can produce some very tasty low fat meals.
My Lower Fat Lemon Yogurt Cake is adapted from the books Natural Yogurt Orange Cake and the result is a zingy lemon cake with less guilt.

Lower Fat Lemon Yogurt Cake
Adapted from New Dairy Cookbook's Natural Yogurt Orange Cake
(Serves 8 - 10)

150 g Stork Margarine, melted and cooled
2 lemons, juice and zest finely grated 
150 g golden caster sugar
150 g low fat natural yogurt
1 tsp vanilla extract
250 g self-raising flour
salt, pinch
2 medium eggs


  • Preheat the oven to 155oC (fan). Grease a 24 cm round spring-form cake tin and line with baking parchment.
  • Put the lemon juice in a jug and add 1 tbsp of the sugar, leave to one side.
  • Put the lemon zest, sugar, margarine, yogurt, vanilla, flour, salt and eggs into a large mixing bowl. Beat thoroughly for 1 minute.
  • Bake in the pre-heated oven and bake for around 1 hour until risen and golden.
  • Place the cake, still in the tin on a cooling rack and pour over the lemon juice. Allow the cake to cool in the tin.

My cake looks considerably flatter than that in the book, this is probably due to the larger diameter of cake tin used. The original recipe also suggests putting orange slices on the top of the cake, I decided not to put lemon slices on top for fear of them being bitter after baking.

Friday 21 May 2010

30-Day Muffin Round Up

As promised some more flavour ideas for the 30-day muffin recipes:

Apple and Raisin Muffins:
(makes 6-8 muffins)

2 small eating apples, peeled and chopped
100 g raisins
400 ml 30-day muffin batter
These were very tasty, I was a big fan of the juicy raisins and perhaps added a few more than was really needed. Mr M thought they would be better without any raisins so I made some without for the next batch.

Apple Muffins:
(makes 4 muffins)

2 small eating apples, peeled and grated
200 ml 30-day muffin batter
These muffins were a little flat, I think I tried to stretch the batter too far. Mr M loved the result though.

Cherry and Almond Muffins:
(makes 5 muffins)

1/3 cup ground almonds, plus extra for topping
Handful of chopped glace cherries
300 ml 30-day muffin batter
These were extra moist, I think this was probably due to the ground almonds. Next time I have a batch of batter in the fridge I may be tempted to add the almonds to every combination of ingredients, they don't add much flavour and will be a big improvement to the texture.

Thursday 20 May 2010

Vegi Pizza

 I have mentioned the 'upside down' pizza incident before and think it is time to explain. In the 3rd and 4th years of my undergraduate degree I shared a fantastic (yet damp) flat in Aberdeen with Miss D (vegetarian) and Mr F (omnivore) where we shared kitchen adventures on a budget - blue and white stripy canned tomatoes, bulk bought cheese and pasta featured heavily. On new years day Mr F and I decided to make pizza for dinner, and with the help of some shop bought pizza bases and lots of red cheddar we produced three spectacular pizzas - 1 vegi and 2 with meat. We waited eagerly for the pizzas to come out of the oven and I removed Miss D's vegi one first with much ceremony only for the topping to slide of and land on the pull down oven door. The toppings were hastily scraped up and popped back on top of the pizza base but the results were less than appetising.

Thankfully my pizza making skills have improved exponentially since then which is a good job as nothing says a cozy Saturday night like a homemade pizza and a movie.

Vegi Pizza
(Makes 2 thin and crispy bases)


Pizza Base:
250 g strong white bread flour (with extra for dusting)
1 tbsp dried yeast
1 tsp sugar
150 ml hand hot water (1 part boiling water, 2 parts cold)
3 tbsp olive oil
Tomato Sauce:
1 tbsp olive oil
2 large cloves of garlic, crushed
400 ml pasata
1 tsp oregano
Vegi Toppings:
Small can sweetcorn, drained
2 green peppers, thinly sliced
Large red onion, sliced
6 chestnut mushrooms, finely sliced
Ball of low fat mozzarella, drained and shredded
100 g low fat mature red cheddar, grated

For the base:

  • Dissolve the sugar in the warm water, stir in the yeast and allow to sit for 15 minutes.
  • Add the flour to a large bowl, make a well in the centre and add the yeast mixture and olive oil.
  • Mix until combined, turn out onto a floured work surface and knead for 5-10 minutes until a smooth dough is formed.
  • Divide the dough into two and place in a greased bowl, cover loosely with cling film (or shower cap) and leave to rest for 30 minutes.

Tomato sauce:

  • Heat the oil in a heavy based frying pan.
  • Add the garlic and fry for 30 seconds, pour on the pasata and stir in the oregano.
  • Cook for 15 - 30 minutes until the sauce is thick (you should be able to draw a wooden spoon through the sauce and the bottom of the pan will remain visible.
  • Season to taste (the pasata can often be bitter so a decent pinch of salt is needed)

Assembling the Pizza:
  • Grease some baking paper with olive oil.
  • Preheat the oven to 200oC (fan assisted), place baking tray in the oven when cool and allow to heat as the oven heats.
  • Roll out one ball of dough until about 0.5 cm thick.
  • Place base on baking paper and cover with half of the tomato sauce.
  • Top the pizza with half of the toppings.
  • Place on top of the heated baking sheet and cook for 20 - 30 minutes until base is crispy and cheese is brown and bubbling. 
  • Cook the second pizza while you enjoy the first warm from the oven.

Monday 10 May 2010

30-day Muffin Batter

My baby sister (Miss G) came to stay this weekend to get some advice on a presentation she has to do at university next week. As its her final year she has been working really hard on dissertations, presentations,course work and preparation for her final exams. I decided that while she was here she deserved a little TLC, dinner served before 9 pm and some pampering - it also gave me the opportunity to make muffins for breakfast.
I decided to give Rachel Allan's 30-day muffin recipe a go, this is for a batter that can be kept in the fridge for up to 30-days and different 'fillings' added giving a wide variety of muffins. This recipe appeals to me as my favorite muffin is Cherry and Almond - two things that definitely don't appeal to Mr M - and by using this batter I can make myself a few of my favorites without feeling guilty or that I have to eat a whole batch of 10-12 muffins on my own! For Saturdays breakfast I tried out some Banana and Maple Syrup muffins to use up a very ripe banana in the fruit bowl, and some some Berry muffins to use up the last of the fruit in my freezer.

The result was some very tasty little muffins, although they were far from the huge over sweetened muffins found in high street coffee shops, and I am looking forward to trying out some more flavour combinations. I will post for the Berry muffins and Banana muffins today and will do a round up post of all the flavour combinations I try out using up the 30-day batter (I have a suspicion that the batter will be used up well before its 30 day expiry date).

I have given my own variations in ingredients.


30-day Muffin Recipe
Makes around 30 muffins
(Adapted from Bake by Rachel Allen)

3 eggs
125 g soft light brown sugar
100 g golden caster sugar
500 ml skim milk
125 ml grape seed oil
1 tsp vanilla extract
 300 g plain flour
 1/2 tsp salt
 2 rounded tsp bicarbonate of soda
 160 g wholemeal flour
25 g wheat bran

  • Preheat the oven to 175oC (fan assisted). Line muffin tin with paper cases.
  • Whisk the eggs, milk, sugar in a jug. Add the milk, oil and vanilla extract and mix well.
  • Sift the plain flour, salt and bicarbonate of soda into a large bowl. Stir in the wholemeal flour and wheat bran.
  • Stir the wet ingredients into the dry ingredients. This is the basic batter.
  • Add the 'fillings' of your choice and fill the paper cases 3/4 full and bake for 15 - 20 minutes, until set and spongy to touch.
Banana and Maple Syrup muffins: Makes 4 muffins. 200 ml 30-day muffin batter, 1 very ripe banana mashed, 30 ml maple syrup.
Mixed Berry muffins: Makes 4 muffins. 200 ml 30-day muffin batter, 150 g frozen berries (defrosted).

Friday 7 May 2010

Rhubarb and Apple Eve's Pudding

When it comes to dessert Mr M is definitely a traditionalist and counts Sticky Toffee Pudding and Fruit Crumbles both served with custard amongst his favorite. My own dessert preferences are for lighter pud's, generally containing berries, meringue and served with ice cream, although the contents of our fruit bowl and freezer generally lend themselves better to Mr Ms preferences to my own. Last week a census of our fruit bowl and freezer led to the discovery cooking apples and frozen rhubarb that would normally become a Mr M pleasing crumble. I had recently been contemplating the joys of 'Soup and a Pudding' (a very Scottish meal, I think, where dinner consists of a bowl soup followed by a warming dessert and bypassing the inconvenient main course) and the wonderful 'puddings' my mother produced during my childhood. My personal favorites were Queen of Puddings or Lemon Meringue Pie, but the crispy meringue that appealed so much to me is a big no no for Mr M, but an Eve's Pudding seemed like a good use of the fruit and a pleasant change to the inevitable crumble.
This most traditional of British puddings consists of finely sliced apples topped with a light Victoria sponge mixture, and as the cake cooks the apples stew. My own version is a twist on the classic with the addition of rhubarb, which add a tartness to the sweet apples. When I repeat this recipe I am planning to increase the amount of fruit as I thought the fruit to sponge ratio a little mean.
I apologise for the mixture of weights used for the recipe below, I generally weigh in metric when cooking but I learned from my mother and grandmother in pounds and ounces and still find the 4, 4, 2, 4 method best for remembering Victoria sponge quantities.

Rhubarb and Apple Eve's Pudding
(Serves 4-6)
For the fruit:
200 g Frozen rhubarb, defrosted
400 g cooking apples, peeled, cored and thinly sliced
50 g golden caster sugar
For the sponge:
4 oz margarine
4 oz golden caster sugar
2 medium eggs
4 oz self raising flour

  • Preheat the oven to 180oC (175oC fan assisted)
  • Layer the fruit and sugar in the base of an oven proof dish.
  • Make the sponge mixture by creaming the sugar and margarine together in a large bowl, add the eggs one at a time along with a little flour, and then whisk in the remaining flour.
  • Bake in the preheated oven for around 30 minutes until the sponge is cooked.
  • Serve hot from the oven with custard or ice cream. Also delicious cold the next day.

Monday 3 May 2010

Banana Coconut Muffins

I have a vast collection of cook books and love nothing more than a lazy afternoon curled up with a cuppa reading my books and planning future kitchen adventures. Google reader has quickly become an extension of my cookery book collection and I regularly read cookery blogs for inspiration and ideas. Coffee Muffins is a great blog written by a work colleague of Mr M's and as a regular reader I could not help but have a craving for some muffins. Like many households our fruit bowl always contains at least one (and often several) over ripe banana and in order to use them up I turned to another of my favorite blogs Dinner with Julie and adapted her Coconut Banana Muffin recipe to suit the ingredients in my cupboard, and did not include fresh coconut. A major plus of this recipe for me is the use of cups, which saves on having to be precise with weights and also makes the muffins super quick to make.


Banana Coconut Muffins
(adapted from Dinner with Julie)
Makes 10 muffins

3/4 cups plain flour
1/2 cup stone ground wholemeal flour
1 tsp baking powder
1/4 tsp salt
1/2 cup dessicated coconut, plus extra to sprinkle
2 mashed ripe bananas
1/2 cup light brown sugar
1/3 cup grape seed oil
1/3 cup low fat natural yoghurt
1 medium egg

  • Preheat the oven to 180oC, line a muffin tin with muffin cases.
  •  Sift flours, baking powder and salt into a large bowl. Add the dessicated coconut and mix well.
  • Mash the banana, sugar, youghurt and egg in a separate bowl.
  • Add the banana mixture to the flour mixture and stir until just combined. 
  • Divide the mixture between the paper cases, sprinkle with the remaining coconut.
  • Bake for around 25 minutes until puffed and golden.

Midday Mezze

Mr M headed out on Sunday mountain biking and I had a wonderful day gardening planned. Unfortunately the previously forecast sunny day failed to materialise and I was unable to plant out my herbs and edible flowers (I have made it my mission only to plant useful plants in my garden - ones that can be eaten or used for medicinal purposes). In need of some sunshine I headed to the kitchen and discovered some wonderful crisp peppers and juicy olives that were crying out to be teamed up with some hummus.

Before the house move we spent a long time using up store cupboard ingredients and the jars of useful pastes and sauces that live in the back of the fridge and have not yet re-stocked our collection (this has been further aggravated by the loss of last years chutney to mildew). It was a lack of tahini paste that led to the inception of the following recipe and a wonderfully bright midday meal.


Hummus

400g can chickpeas, drained
Small red onion, roughly chopped
Small hand full of parsley, roughly chopped
Large garlic clove, crushed
3 tbsp water
1 tbsp sesame oil
juice of 1 lemon
3 tbsp olive oil
lots of freshly ground black pepper and salt to taste

Place chickpeas, onion, parsley, garlic, sesame oil and water in a blender, blend to a rough paste gradually adding the lemon juice and olive oil, taste regularly and add more or less oil and lemon according to your preference. Season to taste.
Serve with warm pitta or flat breads, olives and a selection of crisp veg. I added a good dollop of some spicy Harrisa paste to the top of my hummus for an extra kick.